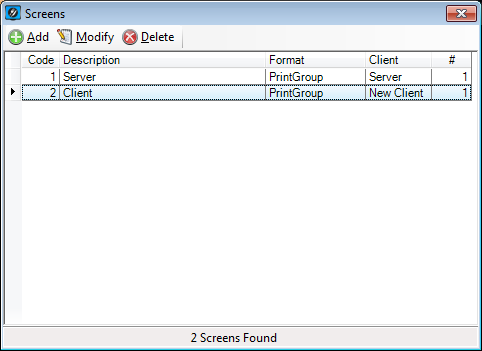
Screens indicate how many display monitors will show the kitchen orders.
Screens have an additional function that can allow them to use the Customer Order Display.
At least one screen needs to be configured before any orders can be displayed.
A screen can be connected to a Server, a Client or both.
The number of screens that are able to be used at any one time is determined by the IKM registration.
You can Add, Modify or Delete any Screens.
Screens are configured according to the settings that are able to be applied.
Screens that are attached to a Server will allow you to use the Customer Order Display, whereas Clients will not.
When configuring screens you cannot change the Code field that is generated, but you can rename the Description field to a custom description relevant to the installation.
When programming screens for IKM Servers, you will have the selection of three tabs which are Display Settings, Bump Bars and Order Format.
When programming screens for IKM Clients you will have the three tabs, plus an additional tab called Printer Associations.
The display settings tab allows you to configure options relating only to one screen (unless a VGA monitor splitter is being utilised).
Connected to – Use the drop down box to select the screen that will be connected.
Orders Area – This area allows you to configure the screens that the orders will be displayed on. There are a number of fields that can make major differences to the display of IKM.
Screen Number – Select which screen the orders will be displayed on. You can press the Identify button which will display a number on the screen that is associated with it.

Number of Rows – Select the number of rows that you want to use on the IKM. Remember that the more rows that you have, the more chance that the orders may need to include a scroll bar to view the entire order. Generally the size of the monitor being used will determine the amount of rows able to be used.
Number of Columns – Select the number of columns that you want to use on the IKM. Generally there is at least double the amount of columns as there are rows. The size of the monitor being used will determine the amount of rows able to be used.
Summary Filtering – The filter settings allow for changing what is presented when the summary is displayed on the order screen. There are four different types that can be selected which are No Filter (None), Include Items, Exclude Items and By Type.
Include/Exclude Items – Allows you to specify the text that you can use for filtering. You have the option of filtering of four different selections which are Starts With, Ends With, Contains and Equals.
By Type – Select from the two available types to show which are Instruction or Hash Text.
Preview – Select the magnifying glass icon to see a preview of the screens. This is only used to display the Rows and Columns that will be used.
The Customer Order Display (COD) will allow you to display to the customer when an order is ready to be picked up by the customer.
The COD will require another monitor to be attached.
The IKM Order Screen will take precedence over the COD screen, so ensure that they are configured to display on separate monitors.
There are two options that are available within the COD menu which are Enable and Configuration.
Enable – Allows the current settings to be used and the Customer Order Display to work.
Configuration – This button allows you to configure the screen and how it will display.
This section is used to setup how the orders that are flagged as ready will be displayed.
Display – Select which monitor will be used to display for the customer. Use the Identify button to select the correct monitor.
Style – Select from Single Order or Scrolling Orders to change additional settings. More information on these settings is located within this chapter.
Background – Select the colours that will be used as the background for the monitor. If you would like a gradient effect, select two different colours, where the first field is the top and the second field is the bottom. If you would like a single colour, choose the same colour for both fields.
The Custom Colours will display the default colours used by IKM.
Font
Select the Font that will be used to display the words/numbers as they are ready.
Fill & Stroke
These fields are used to change the colour of the text.
Fill is the wording itself and Stroke is the outline.
Display Time
Use the slider bar to select a time frame the order will stay on screen for.
The setting allows for five seconds to fifteen seconds.
If there is only one order that is ready the screen will not change.
This field is only available when the Single Order button is selected on the left-side of the COD Settings.
If you want to use this function, you must save your settings with this option selected.
Heading
Select this checkbox if you want to display the sale type that is attributed to the sale.
Transition
Select this checkbox if you want the numbers to change with effects.
Effects that are available are Fade In/Out, Slide with Fade, Grow with Fade, Spin with Fade and Flip with Fade.
This field is only available when the Single Order button is selected on the left-side of the COD Settings.
If you want to use this function, you must save your settings with this option selected.
# of Orders
Select how many orders you want to display at the top of the screen in total that will scroll along.
Font Fill
Select the colour of the font for scrolling orders.
Border
Select the checkbox to confirm the use of a border, and the colour palette to select which colour the border will be.
Fill
Select the checkbox to confirm the use of fill, and the colour palette that will be used as the fill for the order number area.
Fill Opacity
Select the opacity of the scrolling order area.
Logo Image
The logo will be displayed at the bottom right corner of the COD.
If you would like to create custom logos to display, they must adhere to strict guidelines or they may not display correctly, or at all.
Create a folder on the COD terminal (preferably within the Ideal Kitchen Monitor folder) called “Display Logo”.
Browse for the folder containing the logos that you want to display on the COD.
It is recommended to create three separate logo files, as IKM will only display the logo that is the correct resolution for the monitor that is being used.
File NamePixelsExample
Customerdisplay-s.png
90 x 30

Customerdisplay-m.png
150 x 50

Customerdisplay-l.png
300 x 100

Each image must be 96dpi, 32-bit and can support alpha-transparency.
If you would like no logos to display at all, Idealpos supplies a transparent logo that can be used.
By default, the blank logos will be installed in the following location:
C:\Program Files\Idealpos Solutions\Ideal Kitchen Monitor\BlankLogo
The order format specifies the way that orders are displayed on the IKM.
There are two separate fields that can be selected in this area which are Order Grouping and Item Grouping.
The choices available for Item Grouping are only available if you select Print Group as the Order Grouping.
None (Standard) – This is the standard printing option where items will be displayed in the order that the items were entered into the POS Terminal.
Print Group > None – This will separate the items into their respective Print Groups.
Print Group > Accumulate – This will separate the items into their respective Print Groups and then accumulate any items within those groups.
Print Group > Separate All – This will separate items into their respective Print Groups.
Print Group > Accumulate and Separate – This will separate the items into their respective Print Groups and then accumulate any items within those groups. It will also detail the instructions that are to be used for each item.
Print Group > Accumulate and Separate > Summary – This will separate the items into their respective Print Groups and then accumulate any items within those groups. It will also provide a summary of the order at the very top, and if required, the full order can be displayed using the scroll functions.
Print Group > Accumulate and Separate > Seat – This will separate the items into their respective Print Groups and then accumulate any items within those groups. It will also provide the seat number for each item to the right of the order details. This option will only be available on orders that are saved to a Table.
Print Group > Accumulate and Separate > Summary & Seat – This will separate the items into their respective Print Groups and then accumulate any items within those groups. It will also provide the seat number for each item to the right of the order details. It will provide a summary of the order at the very top, and if required, the full order can be displayed using the scroll functions. This option will only be available on orders that are saved to a Table.
Bump Bars are a physical unit that attaches to the PC that is running IKM and will ‘bump’ the orders from the screen.
IKM supports the use of one model bump bar only, which is a Panasonic JS-140MS.
This bump bar has been discontinued by Panasonic and is no longer produced, but a used version may be available, or you can opt to use a touchscreen instead.
The bump bars can be programmed with controls that suit any type of business and you can print the map to a printer that will fit the bump bar.
It is a good idea to go through each scenario before setting these options in stone.
This will allow for the correct use and functionality required of IKM.
You can Add, Modify and Delete any Bump Bars.
Show Average Time Panels – This is only available when a bump bar is being used. If this option is selected without a bump bar, you will not be able to bump orders from the touchscreen.
Standard Kitchen Monitor with buttons:
Kitchen Monitor with Average Time Panel:
There are three different areas when configuring the bump bars to work in IKM which are Settings, Keys and Test.
Settings
Type – Select Panasonic JS-140MS from the drop down menu.
Serial Port – Select the serial port that the bump bar is connected to.
Keys > Actions – Select the Actions button to program the actions that each button of the bump bar will use. There are a possible ten buttons on the bump bar that can be used with a possible sixteen choices.
Inhibit – This will inhibit any key-press on this key, which will perform no operation, essentially disabling it.
Done (Normal) – This will bump orders from the kitchen monitor starting with the first print group in the order and then each subsequent order after that. It also functions as a YES button for all dialog boxes on the display screen.
Done (System) –Closes the display screen.
Done (Recall) – Selects a particular order.
Zoom (Normal) – Opens the Zoom window and display the order larger.
Recall – Opens the Recall window to select an order to recall.
Close – Closes the display screen.
Delete (Normal) – This will delete the order onscreen. It also functions as a NO button for all dialog boxes on the display screen.
Up, Down, Left, Right – Directional keys that allow you to select different orders.
Up, Down (Zoom/Order) – Enables you to scroll UP or DOWN within the order items.
Left, Right (System) – Change pages from Previous to Next.
Scroll Up/ Down (Normal) – These allow you to scroll up and down through the order items.
Summary – Toggles the display of the Summary column.
Undo (Normal) – The undo will only undo an operation on an order with Print Groups where it's not set to Auto-Done.
Options – Allows you to toggle different through Bump Bar Modes.
1st key-press will change the display screen to enter into Order Mode. This will allow you to use the Scroll Up/Down functions on the actual order.
2nd key-press will change the display screen to enter into System Mode. This will allow you to close the IKM screen with the “Done” button.
3rd key-press will return the display screen back to Normal Mode.
Print (Normal) – This will print a runner docket for the order.
Ready – This will change orders to a “Ready” status and force them to display on the COD.
Keys > Colours – Select the Colours button to decide which colours you want to display on the bump bar. There is no option to change the colour or size of the text.
By default all buttons are white.
It is a good idea to use different colours to group different types of buttons, not a different colour for each button.
Press the button you want to change and the colour palette window will open.
Select the colour you want to use and press OK.
The display preview will show the colour change.
It is important to note that the colours on the screen may differ from what is printed.
Keys > Print Map – This button will allow you to print the Bump Bar design to a printer for use.
When the printout has finished, there are four small area that are marked with dots that need to be cut out to fit correctly into the Bump Bar.
Test – This section is where you can test that the Bump Bar is communicating correctly and the button functions that you have selected will work.
Click on Start Test button.
Press each button to test the function matches and performs the way you want.
While using the testing feature, you cannot make changes to the Bump Bar configuration.
Press Stop Test to exit the testing function.
The use of printer associations is to set items to separate between the Server and Client monitors.
This enables the client monitor to only display the orders that are required for a particular station and not include items they do not make or serve.
To enable this to be set up, you need to create two printers on the Stock Items for different IKM monitors, one for Server the other for Client.
In Idealpos, go to: Setup > POS Terminals > Modify POS 1 > Rename a KP # to IKM Client.
In Idealpos, go to: File > Stock Control > Stock Items > Modify the Stock Items that will be displayed on the Client monitor only > Select the IKM Client Printer you renamed > Save.
Use the Printer Associations to link the single IKM Client printer to the Client monitor.
You will need to know which Kitchen Printer in Idealpos you have configured, as IKM does not port the names across.
The Notification Tab is used to enable and configure third-party hardware for paging customers when their Order is ‘Ready’ or ‘Done’.
You cannot program any settings until you have enabled the function.
Use the drop-down menu to select from None, BluFi Boomerang V1, BluFi Boomerang V2 or Genesis Paging BluFi Boomerang.
You also need to select which function will send the page using ‘Ready’ or ‘Done’.
Address (Genesis Only)
This is the address of the Server.
Port (Genesis Only)
This is the Port that the Server listens on.
CapCode
This is the prefix for the Pager and is generally 3 characters long.
Additional zeros required will be padded to match.
ConnectedTo
This is set to the COM Port that the device will be connected to.
Custom Prefix (Genesis Only)
Apply a custom prefix before the information is sent to the pager to enable the system to filter messages.
FunctionLevel
This setting is based on the specifications of the devices that you will be using.
Message
This is the message that gets sent to the Pager.
To include the Order Number in the message, add %order% as part of the message.
CommunicationMode
Use the drop down to select Numeric Only or Alpha Numeric.
This is the format of the message that will be sent to the Pager.
If Numeric is selected, any alpha characters will be stripped.
FallbackToOrder (Genesis Only)
Fall Back to Order Number
Message Preface (Genesis Only)
Preface Messages With. A space must be added at the end.